Get 10% off all products! Limited coupons available. Use Coupon "10OFF"

Everything has some sorta of top or cover to protect itself from the elements.  Chimneys are no exceptions. These caps are essential no matter what style or size your chimney is.  If there wasn’t a roof over your home all of your possessions would get soaked, and your pool would be damaged during cold months if there was not a cover. A chimney crown which is on top of a chimney prevents the brick at the very top of the crown from exposure to the elements.

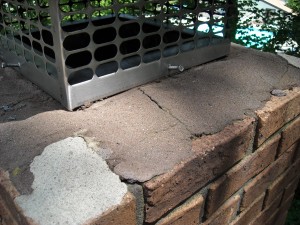
Chimney Crown with mortar

Since the crown is exposed to the harshest elements, cracks frequently occur. When cracks occur in the crown, they will continue to grow and deepen as water enters them from rain and melting snow and ice. These become extremely problematic, weakening your chimney and leading to its eventual need of a rebuild.

Cracks in the crown must be taken care of as soon as possible with a sealant to prevent them from worsening and jeopardizing the strength and life of your chimney. Various treatments exist, but siloxane treatments have the best life and protection and often can be stored for a few years to re-treat and treat any new cracks that may develop over time. ChimneySaver products such as CrownCoat have been tested and proven over time to give chimneys the protection they require. The chimney projects above the roofline, making it a perfect target for damage from the weather, so your average brick and masonry sealant is not going to provide the needed protection.

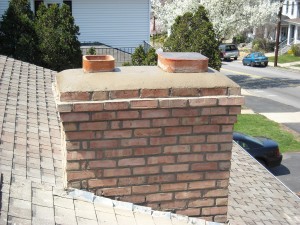
Newly poured concrete crown

Crowns need to be constructed properly to begin with. Also, very commonly used, mortar crowns are in no way recommended. Mortar is what holds bricks and blocks together, but it is not the proper material for constructing a crown. Concrete, made with Portland cement, stones, and sand, is what should be used to construct a crown. The stones make for strength that cannot be matched by mortar alone. The concrete will prevent the weather from wearing down more and more on the chimney itself.

The crown is one of the most important components of the chimney yet so often overlooked.


    *Note: If you have a terra cotta clay chimney
    flue lining, be sure to measure the true length and width of the
    inside of your chimney flue space.

    *If there is a terra cotta clay flue liner, does it protrude out of
    the top of the chimney at least 2 inches? If there are at least 2
    inches and the terra cotta clay is in good condition, you will use
    our stainless steel, terra cotta top plate that has a 1 1⁄2inch edge
    that goes all the way around (like a shoebox lid).

    *If your terra cotta clay flue is in bad shape at the top, you may
    need to just take a hammer and tap all around that terra cotta,
    taking it away to make the surface flat at the top of your chimney.
    In that case, you will simply use the flat top plate that comes with
    our liner kit.


    *Note: If you have a terra cotta clay chimney
    flue lining, be sure to measure the true length and width of the
    inside of your chimney flue space.

    *If it is on the back of the stove, is it parallel with the back of the stove or is it at an angle, like 45 degrees?

    *If it is at an angle you will use an insert stove adaptor (an insert liner kit) rather than a two-part tee with cleanout cap.


    Usually pellet stoves have an exhaust hole id of 3 inches. However, if you are going up more than 15 feet to the top of your chimney you need to use a pipe and/or flex liner that is 4 inches diameter.


    If you are only venting a hot water heater then the exhaust hole diameter is probably 3 inch diameter. If it is 3 inch diameter and you are going up more than 15 feet to the top of your chimney, you must use a 4 inch diameter flexible liner or ridged pipe for proper draft. We also suggest to go ahead and use a 4 inch diameter flexible liner or ridged pipe even if the total length is 15 feet or less.


    Not the depth or any other dimension inside your fireplace.

    Most gas log fireplaces require an 8 inch liner kit or rigid kit. But do not assume that is the case for the gas log fireplace kit you are installing. Obey the requirements for that specific unit that are in your installation/instruction manual.

    THANK YOU FOR ANSWERING THOSE QUESTIONS

    NOW GIVE US A CALL AND SPEAK WITH ONE OF OUR TECHS

    866-941-5112